AWS AppSync with a Lambda Authorizer via CDK v2 nested stacks
Stand up AppSync with a Lambda authorizer using a nested-stack CDK pattern that scales cleanly.
Originally published on AWS in Plain English.

Photo by Oskar Yildiz on Unsplash
Introduction
We all know how GraphQL changes the perspective of distributing data for mobile architecture as well as for the backend architecture. For using the benefits of GraphQL in the cloud services like AWS, we have a service called “AWS APPSYNC”. In this blog, we are gonna talk about how to create appsync with lambda authorizer using AWS CDK v2
Prerequisites
Before jumping into this blog, you required these prerequisites by your side
- Your Favourite Text Editor / IDE
- AWS Account
- Typescript/ JavaScript Knowledge
- Knowledge of Basic GraphQL
- Knowledge of IAC like AWS CDK
- Cup of your favourite drink! I have My Green Tea!
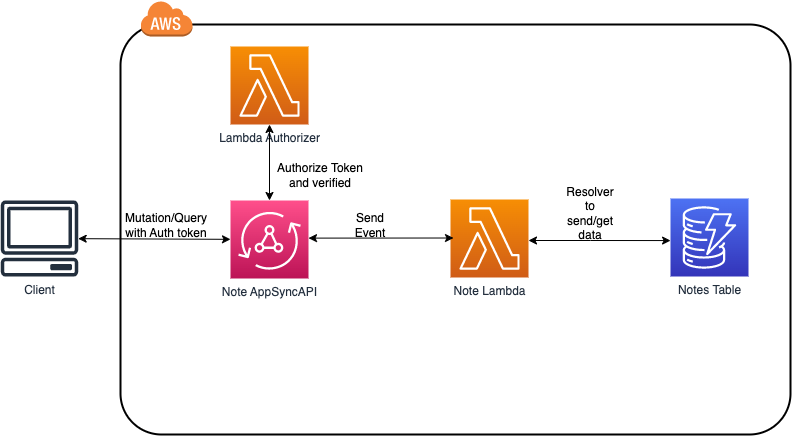
Architecture diagram
What is AWS AppSync?
AWS AppSync is an enterprise-level, fully managed GraphQL service which has real-time data synchronization and offline programming features. Ideally, AppSync is the Service you can use for GraphQL if you want to use it inside your cloud environment without using any external libraries. It supports 5 ways of authentication. Supported Authentication methods are AWS_IAM, AWS_COGNITO_USER_POOLS,AWS_LAMBDA,API_KEY,OPENID_CONNECT
For Full Documentation: https://docs.aws.amazon.com/appsync/latest/devguide/what-is-appsync.html
What is a Nested Stack?
Nested stacks are stacks created as a part of other stacks. You create a stack within another stack by using the AWS::CloudFormation::Stack resource. Mainly, you can separate the stacks and use them in multiple places. The use of Creating a Nested stack is the Reusability of resources.
In this blog, we are going to see how to create a separate resource using a nested stack and use it in the main stack using AWS CDK v2
What is Lambda Authorizer, and What is the use of Lambda Authorizer in general?
Let’s say you have to do some custom logic on your workflow based on the access token you verify by not just storing the user information from the access token, how would you do that during your authentication process? Lambda Authorizer
Lambda Authorizer is a lambda function that helps you to control access to your API. Where you have much flexibility on the logic part. You can do whatever in the function, not just the authentication. You can use this function to do other stuff like loading the authenticated data to other services like dynamodb or moving the response to the AWS SQS queue for you to pull later. Use your imagination in this.
Creating AppSync with its lambda authorizer using CDK v2 library
OK! Now the real stuff! Before, creating the AppSync with lambda authorizer. Please check whether you have aws_cdk it in your system by running cdk —version it in your terminal. If you didn’t find CDK in your system, run this command to install CDK in your system.
npm install -g aws-cdkOnce you successfully installed the CDK in your system, create a folder in your workspace and change your directory into the newly created folder by running this command.
mkdir appsync-nodejs-cdkcd appsync-nodejs-cdkAfter you move to the created folder, run this command to create your CDK stack with the basic project structure in the current folder.
cdk init app --language=typescript .And this is how it will look

Open your project folder in any one of your favourite IDEs or Text Editors. In my case, I am going to use VS Code. Once you open your project folder in your editor, go to this path /lib/{your-stack-name}.ts to open that file and be ready to add some magic to that file. For this blog, I am going to open it and add code to it.
// lib/appsync-nodejs-cdk-stack.tsimport \{ CfnOutput, Stack, StackProps, RemovalPolicy, Duration\} from 'aws-cdk-lib';import \{ Construct \} from "constructs" import \{CfnGraphQLApi,CfnGraphQLSchema, CfnDataSource, CfnResolver,\} from 'aws-cdk-lib/aws-appsync'import \{ readFileSync \} from 'fs';export class AppsyncNodejsCdkStack extends Stack \{ constructor(scope: Construct, id: string, props?: StackProps) \{ super(scope, id, props);// cloudwatch logs for Appsync const cloudWatchLogsRole = new Role(this,"AppSyncCloudWatchRole",\{ roleName: `$\{apiUserName\}CloudWatchRoleForAppSync`, assumedBy: new ServicePrincipal('appsync.amazonaws.com'), managedPolicies: [ ManagedPolicy.fromAwsManagedPolicyName('service-role/AWSAppSyncPushToCloudWatchLogs')] \})// creating appsync api const notesApi = new CfnGraphQLApi(this, 'NotesApiTesting',\{ authenticationType: "AWS_LAMBDA", name: `$\{apiUserName\}-notes-appsync-endp`, xrayEnabled: true, logConfig: \{ cloudWatchLogsRoleArn: cloudWatchLogsRole.roleArn, excludeVerboseContent: false, fieldLogLevel: "ERROR" \} \}) // SCHEMA const notesSchema = new CfnGraphQLSchema(this,'NotesSchema', \{ apiId: notesApi.attrApiId, definition: readFileSync('lib/graphql-schema/schema.graphql').toString() \})\}In the above code block, the code for creating appsync in AWS CfnGraphQLApi() is a function to create the AppSync API endpoint. It has a property for adding authorizationType
Which takes the string values. For this blog, I have passed the value “AWS_LAMBDA” because we are going to use Lambda for our authentication process. I have marked xrayEnabled: true to enable X-ray logging for our API endpoint. To enable CloudWatch logs for logging only errors of our API response by passing this property logConfig.
The next important part of GraphQL is Schema, to create a schema for our API we need to use this CfnGraphQLSchema() function and adding the apiId of created GraphQL API in the property apiId and create your schema. graphql file and paste this code. @aws_lambda is a decorator who says this field needs to be authenticated, and the authorizer should return true to access it.
// graphql-schema/schema.graphqltype Note @aws_lambda \{ id: ID! name: String! completed: Boolean!\}input NoteInput \{ id: ID! name: String! completed: Boolean! \}input UpdateNoteInput \{ id: ID! name: String completed: Boolean\}type Query \{ getNoteById(noteId: String!): Note @aws_lambda listNotes: [Note] @aws_lambda\}type Mutation \{ createNote(note: NoteInput!): Note @aws_lambda updateNote(note: UpdateNoteInput!): Note @aws_lambda deleteNote(noteId: String!): String @aws_lambda\}And pass the file path to the property definition. Now we need a way to connect the GraphQL operations createNote, updateNote, etc. to a data source. In this blog, we’re going to map the operations into a Lambda function that will be interacting with a dynamodb table.
To implement this functionality, we have to create the Lambda function and then add it as a data source to our API. Add the following code mentioned below for creating lambda, dynamodb, and data source lib/{your-file-name}.ts with role and permissions.
// lib/appsync-nodejs-cdk-stack.ts// appsync Table creation part const notesTable = new Table(this,`CDKNotesTable-$\{apiUserName\}`,\{ tableName: dbTableName, billingMode: BillingMode.PAY_PER_REQUEST, partitionKey: \{ name: 'id', type: AttributeType.STRING, \}, removalPolicy: RemovalPolicy.DESTROY \})// Lambda Layer for adding resolvers inside the lambda function const resolverLayer = new LayerVersion(this,'notes-resolver-layer',\{ compatibleRuntimes: [ Runtime.NODEJS_14_X, Runtime.NODEJS_16_X ], code: Code.fromAsset("lib/lambda/layers/crudNotes/"), description: "Added CRUD Resolver codes for this lambda to use it" \})// lambda const notesLambda = new Function(this,"AppsyncNoteLambda",\{ functionName: `$\{apiUserName\}-main-notes-lambda`, runtime: Runtime.NODEJS_14_X, handler: 'index.handler', code: Code.fromAsset('lib/lambda/'), memorySize:1024, timeout: Duration.seconds(60), layers: [resolverLayer] \})const invokeLambdaRole = new Role(this,"appsync-lambdaInvoke",\{ assumedBy: new ServicePrincipal("appsync.amazonaws.com") \}) invokeLambdaRole.addToPolicy(new PolicyStatement(\{ effect: Effect.ALLOW, resources: [notesLambda.functionArn], actions: ["lambda:InvokeFunction"] \}))// authorizer Role const allowAppSyncPolicyStatement = new PolicyStatement(\{ effect: Effect.ALLOW, actions: ["lambda:InvokeFunction"], resources: [ "arn:aws:iam::*:role/aws-service-role/appsync.amazonaws.com/AWSServiceRoleForAppSync", ], \});// for datasource for the gql const lambdaDs = new CfnDataSource(this,"NotesLambdaDatasource",\{ apiId: notesApi.attrApiId, name: `$\{apiUserName\}LambdaDatasource`, type: "AWS_LAMBDA", lambdaConfig: \{ lambdaFunctionArn: notesLambda.functionArn \}, serviceRoleArn: invokeLambdaRole.roleArn \})// adding api dependcy to datasource lambdaDs.addDependsOn(notesApi)// db access for the lambda notesTable?.grantFullAccess(notesLambda) // adding table as a env inside the lambda as a dependency notesLambda.addEnvironment('APPSYNC_TABLE', notesTable?.tableName)We have created a table to store the data from our lambda function whenever we made a query and mutation. Added table_name as an environment variable in lambda to access it. Created the DataSource using CfnDataSource() function and configured the lambda for the data source and added the service role for this data source. If you want to use any external libraries in your lambda, store those in form of Layers by using LayerVersion() and adding them to the property layers in your Function(). Format for layers lib/lambda/layers/{random_name}/nodejs/ and add your external libraries or add your helper function in it and use it in your lambda code by importing /opt/{name_u_made}/nodejs.
We need to create Resolvers for GraphQL Operations to interact with the data source.
Add the following code below our data source definition.
//lib/appsync-nodejs-cdk-stack.ts// resolvers creation const getNotesByIdResolver = new CfnResolver(this,"getNotesResolver",\{ apiId: notesApi.attrApiId, typeName: "Query", fieldName: "getNoteById", dataSourceName: lambdaDs.name \}) const listNotesResolver = new CfnResolver(this,"listNotesResolver",\{ apiId: notesApi.attrApiId, typeName: "Query", fieldName: "listNotes", dataSourceName: lambdaDs.name \}) const createNoteResolver = new CfnResolver(this,"createNoteResolver",\{ apiId: notesApi.attrApiId, typeName: "Mutation", fieldName: "createNote", dataSourceName: lambdaDs.name \}) const deleteNoteResolver = new CfnResolver(this,"deleteNoteResolver",\{ apiId: notesApi.attrApiId, typeName: "Mutation", fieldName: "deleteNote", dataSourceName: lambdaDs.name \}) const updateNoteResolver = new CfnResolver(this,"updateNoteResolver",\{ apiId: notesApi.attrApiId, typeName: "Mutation", fieldName: "updateNote", dataSourceName: lambdaDs.name \}) // adding schema to the resolve as a dependency getNotesByIdResolver.addDependsOn(notesSchema) listNotesResolver.addDependsOn(notesSchema) createNoteResolver.addDependsOn(notesSchema) deleteNoteResolver.addDependsOn(notesSchema) updateNoteResolver.addDependsOn(notesSchema)Creating Lambda Authorizer using Nested Stack
Using NestedStack is always appreciable to avoid unnecessary headaches over finding where were our resource definitions in our huge single stack file. The bonus point is we can reuse our resources on multiple occasions.
In our Lambda authorizer, we are verifying the JWT token from the front end and verify the token using jsonwebtoken the library inside the lambda function.
Remember the event AppSync has a property authorizationToken it carries your token from the front end when you pass it in the request header as Authorization. Lambda Authorizer has to send a response with a property isAuthorized = true as a mandatory response. If you need any extra information need to add to your resolver, you can pass those values as an array of objects in resolverContext. Add the following code to create your Lambda Auth definition.
//lib/lambda-authorizer-nested-stack.tsexport class LambdaAuthorizerStack extends NestedStack\{ readonly lambdaAuth: Function constructor(scope: Construct, id: string, props?: NestedStackProps)\{ super(scope,id,props) // context we get from external; const userName = this.node.tryGetContext("user-name") // Lambda Layer for Auth Lambda inside the lambda function const authLayer = new LayerVersion(this,'auth-layer',\{ compatibleRuntimes: [ Runtime.NODEJS_14_X, Runtime.NODEJS_16_X ], code: Code.fromAsset("lib/lambda/layers/auth/"), description: "Added Auth Layer Dep for its modules" \}) this.lambdaAuth = new Function(this,`lambda-auth-$\{userName\}`,\{ functionName: `$\{userName\}LambdaAuthorizer`, runtime: Runtime.NODEJS_14_X, code: Code.fromAsset('lib/lambda/'), handler: 'appsync-auth.handler', memorySize: 1024, timeout: Duration.seconds(30), layers: [authLayer] \}) // lambda auth creation cfn output new CfnOutput(this,`$\{userName\}-appsync-lambda-auth-op`,\{ value: this.lambdaAuth.functionName \}) \}\}Adding Lambda Authorizer to AppSync with proper permission and policy
Once you’re done with adding this code to your file, import this stack inside the lib/{your_name_main_stack}.ts Add the roles and policies for the lambda authorizer and configure our API definition by mapping the authorizer’s function ARN.
//lib/appsync-nodejs-cdk-stack.ts//👇🏻 imported the nested stack resource in our main stack fileconst \{ lambdaAuth \} = new LambdaAuthorizerStack(this, "AppSync-lambda-authorizer")const notesApi = new CfnGraphQLApi(this, 'NotesApiTesting',\{ authenticationType: "AWS_LAMBDA", name: `$\{apiUserName\}-notes-appsync-endp`, xrayEnabled: true, logConfig: \{ cloudWatchLogsRoleArn: cloudWatchLogsRole.roleArn, excludeVerboseContent: false, fieldLogLevel: "ERROR" \},// 👇🏻 configured the lambad authorizer for our appsync api lambdaAuthorizerConfig: \{ authorizerResultTtlInSeconds: 5, authorizerUri: lambdaAuth.functionArn \}, \})//👇🏻 used our imported nested stack resourcelambdaAuth.addToRolePolicy(allowAppSyncPolicyStatement)lambdaAuth.addPermission("subbu-appsync",\{ principal: new ServicePrincipal("appsync.amazonaws.com"), action: "lambda:InvokeFunction"\})NOTE:
💡 Add these two lines to your code, else you will get BadRequestException
lambdaAuth.addToRolePolicy(allowAppSyncPolicyStatement) lambdaAuth.addPermission("random-name",\{ principal: new ServicePrincipal("appsync.amazonaws.com"), action: "lambda:InvokeFunction" \})We have added all the resource definitions in lib/appsync-nodejs-cdk-stack.ts. Please add your logic inside your lambda codes based on your needs. In this blog, I am not planning to show my logic code here.
**You can check my entire code here: **https://github.com/subbusainath/appsync-nodejs-cdk-lambda-auth
Now, the Most Important scenario………. ! Deploying the created resources to our AWS Account. Use the following command to compile our typescript file before we deploy it.
// compiling the typescript files and run diff to see what are the changes made in our stacknpm run build && cdk diff --profile \{if you have seperate profile/acc\} -c \{your context variable if you are using any\}// Once it is compiled run the deploy command cdk deploy --profile your_profile_name -c your_context_name=valueOnce your stack got deployed, you will get this response

Testing endpoint using Insomnia
Let’s test our endpoint using our Insomnia as well as AppSync Console. We will check our cloudwatch logs if we have any errors in our API endpoint.
On Success, Insomnia

In Appsync Console,

In error, Insomnia

In CloudWatch, (On Error)

In AppSync Console,

Conclusion
Now you can use your idea to your GraphQL API endpoint using AppSync with Secured way, and you can use your imagination to add your customized authentication in a lambda function and rule the tech world.
Put your music on your headphone! One huge cup of Caffeine for Coding Energy! Urge to learn something new every day! Stay Hydrated!
Until It’s a wrap from theGentleGiant !!!!!!!!!!!!!!!!!!!!!!
Follow me on Social Media:
https://www.instagram.com/im_sainath
https://www.linkedin.com/in/subbusainath-rengasamy-02609b188/
https://github.com/subbusainath
*More content at PlainEnglish.io. Sign up for our free weekly newsletter. Follow us on *Twitter, LinkedIn, YouTube, and *Discord. Interested in Growth Hacking? Check out *Circuit.
How to create AWS AppSync with Lambda Authorizer using AWS CDK v2 with Nested Stack was originally published in AWS in Plain English on Medium, where people are continuing the conversation by highlighting and responding to this story.